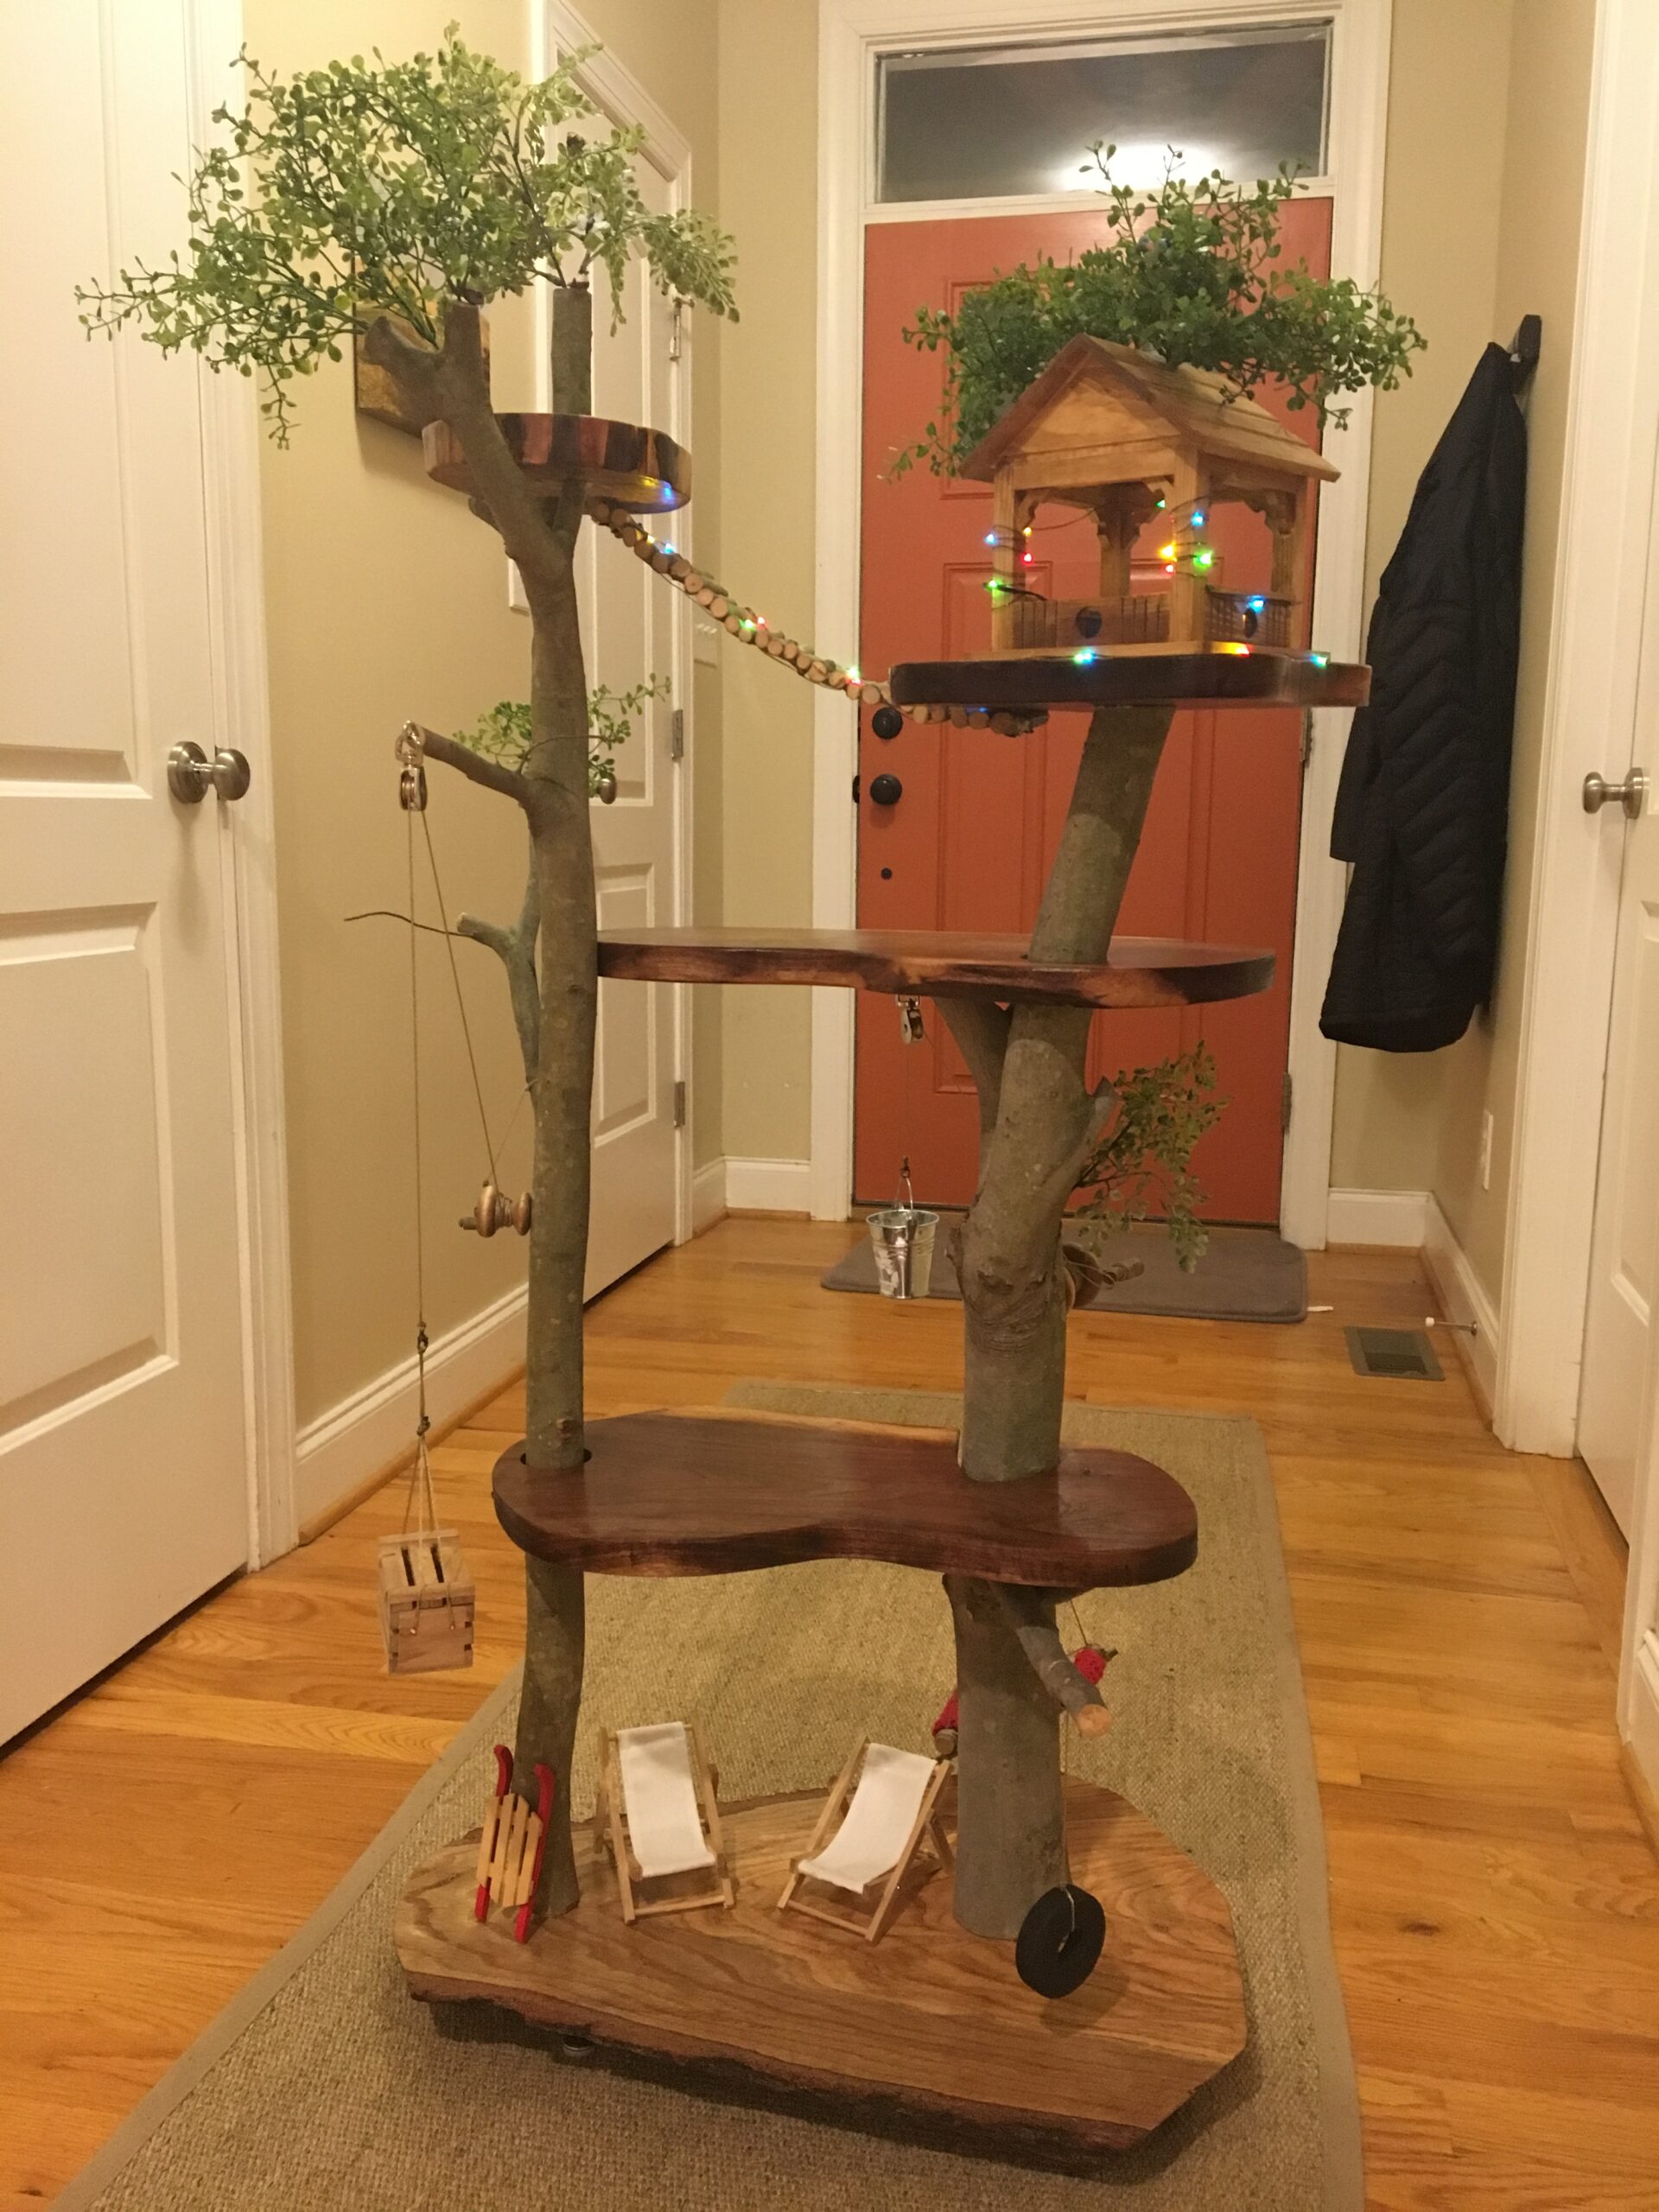
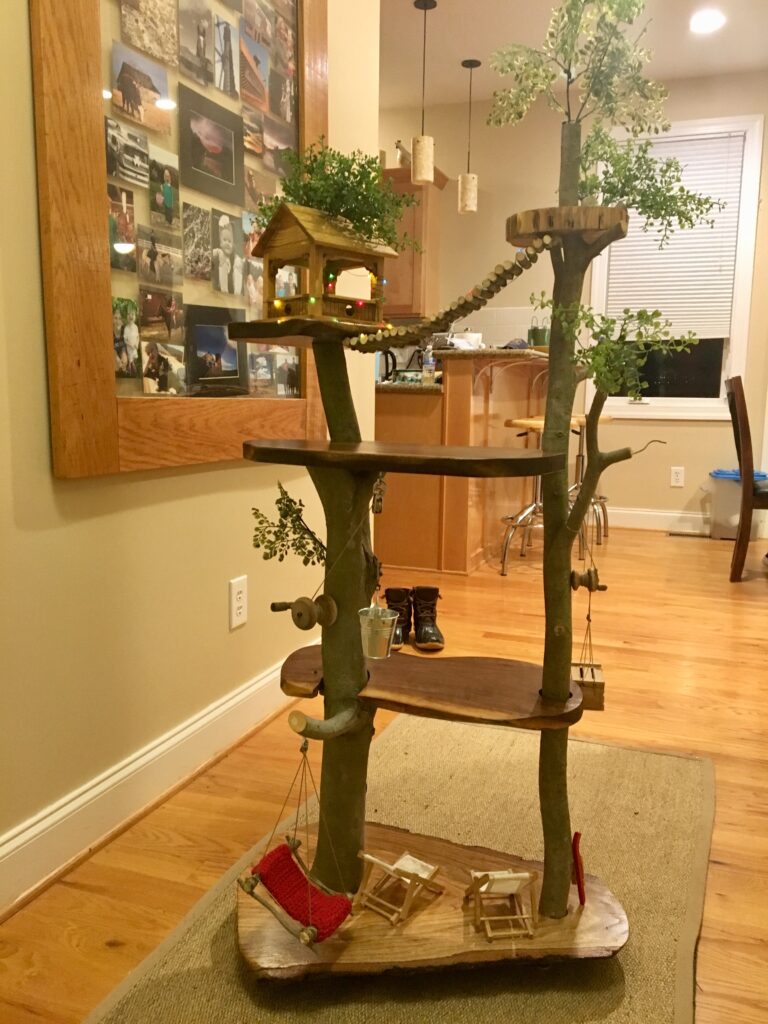
Build this affordable indoor treehouse DIY out of basic materials that will engage any child’s imagination. Hands down, this has to be one of my most favorite projects. It’s fun and charming. This beauty will still serve as a conversation piece long after my daughter outgrows it.
This is the kind of treehouse I dreamed of having as a kid, only lifesized. Today, my youngest would like one, too. I had an idea, “Let’s make a different kind of treehouse. What about an indoor treehouse to engage the imagination?”
Play Research
A clinical report entitled, The Power of Play: A Pediatric Role in Enhancing Development in Young Children, by the American Academy of Pediatrics, stresses the importance of imaginative play, stating, “make believe, and imaginary play encourage the use of more sophisticated language to communicate with playmates and develop common rule-bound scenarios.”
Further, the American Academy of Pediatric’s clinical report, The Power of Play: A Pediatric Role in Enhancing Development in Young Children, discusses the benefits of play not only for developing skills, but play serves a much deeper, and broader, purpose. The report states, “Play not only provides opportunities for fostering children’s curiosity, self-regulation skills, language development, and imagination but also promotes the dyadic reciprocal interactions between children and parents, which is a crucial element of healthy relationships.”
DIY Details
What a fun way to encourage a child’s imaginative play! Since this treehouse turned out so beautifully, I’m sharing this DIY on behalf of all the kids out there. I know there are many who would enjoy this and what’s more, it’s a complete break from screens. So, for those who are a little bit handy, and have access to some common tools, this can be built in a weekend.
To get started, select a tree trunk that inspires you.
The Beauty of a Beech Tree

The beech trees on our property were my inspiration for the indoor treehouse. Their smooth bark looks clean and is easier to dust.
Selecting the Ideal Indoor Treehouse Trunk
When we discovered the right tree, we removed the top section. That section was just above a branch. Cutting there allowed us to save the rest of the tree. I love this handy little mini cordless chainsaw for small trees and wood pieces that don’t require lugging something larger around. It has been so handy, that I have purchase two as gifts https://amzn.to/3IzmAux.

It was finally time to start fashioning the trunk into what I had envisioned. We removed extra limbs until the trunk resembled the desired shape that I had in mind. The design logistics were the most challenging part. Do we need to shorten the trunk? How tall will it be when completed with all attachments? The process required thought, but it wasn’t rocket science.
Once the trunk was prepped, we had to design the details of each level around the curves and sways of it. By the way, when I write “we,” I am referring to my husband and I. He is often an intricate part of helping me turn project ideas into a success, and the brains behind many technical solutions in our projects. He’s an engineer, so reinforcement and design are especially important to him. Sorry, I digress, but it never hurts to have technical input from someone whose knowledge you respect.
Indoor Treehouse Wood
It was time to start at the bottom and work our way up, since our indoor treehouse needed a base. Thankfully, we had this piece of oak leftover from a project. My husband had it tucked away with wood that I probably would have tossed in the firewood pile. I didn’t see the potential in this small slab of oak. However, as you can see, it looked great sanded and coated in fresh poly.
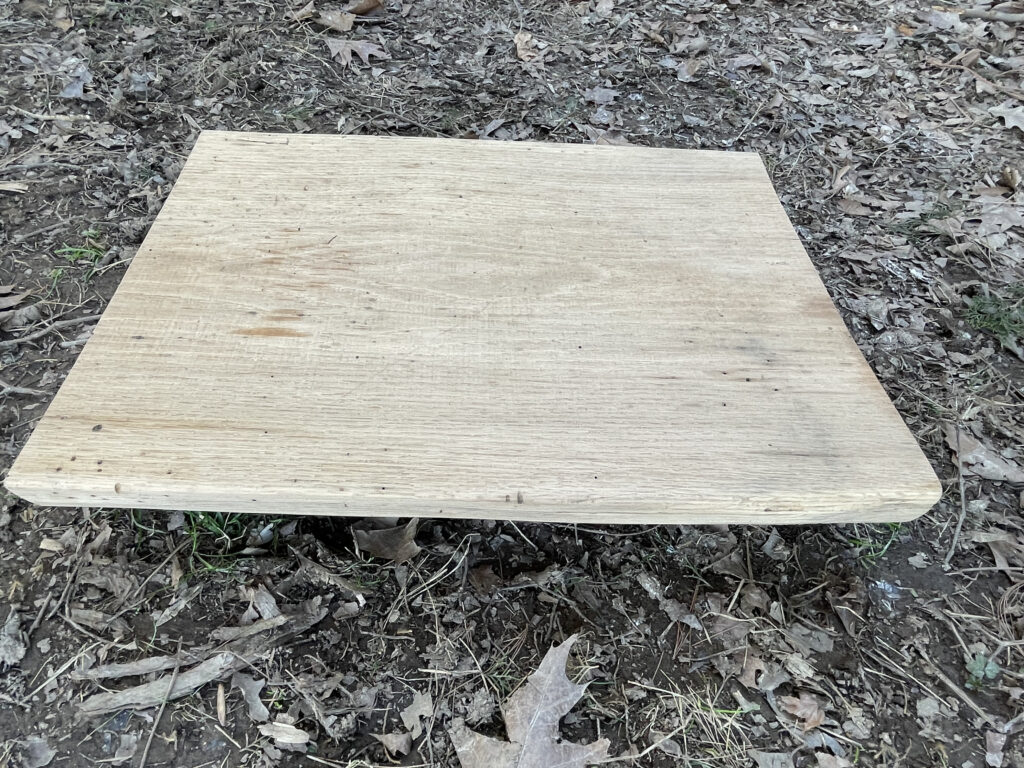
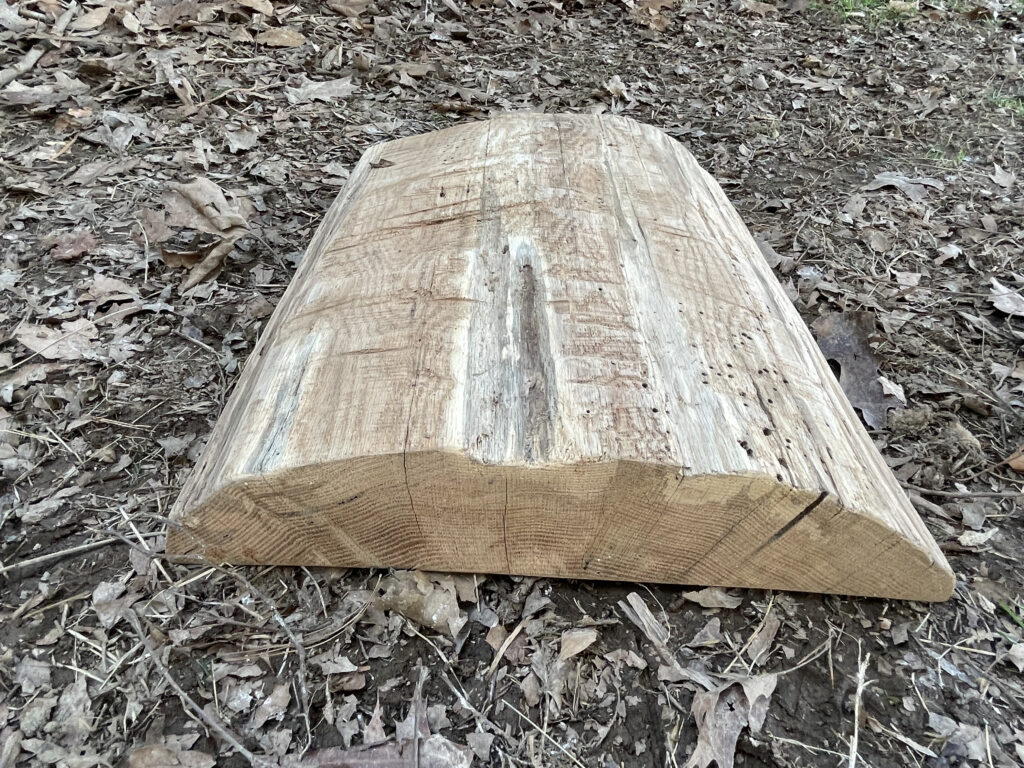
It never ceases to amaze me that even the dullest piece of wood shows glimpses of its hidden character when stained and polyurethaned. Both products magnify the grain and beauty of the raw wood. This piece of oak did not disappoint.

Attaching Trunks To Base
We took great care to securely attach the trunks to the base, so the treehouse would be robust and sturdy. My husband predrilled the oak base and each tree trunk bottom. He then secured each trunk to the base with a 1/4″ lag bolt, several inches long. That worked really well at stiffening up the trunks and was the best way we found to attach the main pieces. I should mention that he didn’t want the heads of the lag bolts to be visible underneath, so he countersank them. However, countersinking is a matter of personal preference. Don’t forget to use a washer with your lag bolt.
An Extra Set of Hands, Please!
After attaching the trunks to the base, we had to be very delicate with them until all levels were attached. This is the part of the process where having a second set of hands is so helpful. For the person who tackles projects alone, the assemby goes a lot smoother with a second person to help steady the boards while they are being connected. When the boards connecting the trunks were finally attached, the whole treehouse was solidified. It was sturdy and stable.
The final height was nearly 5 feet tall. That’s a great height for kids ages 6 or 7 and up. If you’re building this for a small child, consider their height when designing your treehouse.

Indoor Treehouse Tips & Tools
Jig Saw
Cutting the right size and shape for the top three levels of the indoor treehouse became our focus. I drew the shape of each level on walnut wood. We then used a jig saw to cut the shapes.
Hole Saw Attachment
A larger hole saw attachment for the drill allowed the trunk to fit through each level. Hole saw attachments come in various sizes and they can be purchased in kits. We needed 2 sizes for this project. These attachments make clean holes and actually cut through various materials. My husband prefers the design of these saw attachments because he believes that they are much more robust with 4 holes. https://amzn.to/3Zj59oW
Sanding
A hand sander with 120 grit sandpaper easily smoothed the pieces of wood. We prefer a “detail sander” over the other styles of handsanders, when working with tight spaces and corners https://amzn.to/3kvnDUr.
Pre-fit & Final Prep
Since we wanted to be assured that everything was a fit prior to polyurethaning, we pre-fit the pieces together. Then we took everything apart. Next, each individual piece was sanded and finished with 3 coats of polyurethane. Note: all wood finishing with stain and poly takes place PRIOR to final assembly.
Stain and Polyurethane for the Indoor Treehouse
Consider your project and whether it will be stained and/or polyurethaned. Both reveal variations in grain and color when they are applied. If you’re like me, you love the natural character of wood. That’s why I usually stick with natural stain and then clear polyurethane. My reasoning behind this is that wood tends to darken over time, and clear polyurethane ensures the wood will remain as light as possible. It’s just a matter of preference though.
How fun would it be to build a similar piece for an office, and finish it with a darker stain, making it appear a little more formal to match typical office furniture?
Minwax
Typically, I use Minwax when staining. It offers an array of colors to match any room decor. Check out these choices. A 1/2 pint can is all you need since one coat of stain is more than enough for this project. https://amzn.to/3y14GMl
Polyurethane
A larger can of polyurethane is required if applying 3 coats. We always use waterbased polyurethane for lower odor, faster drying, and easier clean up. Be aware that the ideal air temperature for drying is 70-77 degrees. Drying time varies between 2-8 hours with water based polyurethane. However, 2 hours is the average. Note: I did not apply polyurethane to the trunks.
Finishes
What kind of finished look are you going for? For instance, I like a semi-gloss finish for most projects. However, it’s all personal preference. A satin finish has very little sheen and appears matte. Semi-gloss has a little more sheen, whereas a gloss finish has the highest sheen. Consider what you’d like the final product to look like.
Minwax semi-gloss polyurethane has worked well for us over the years of projects we’ve tackled, and this is what we use https://amzn.to/3ZdxME2.
Don’t forget to sand in between each coat of polyurethane with just a gentle scuffing. Using a light grit sanding sponge, like 220, is usually all that’s necessary to prep the wood for the next coat of poly. Here’s what we use: https://amzn.to/3KE8FpL.
Greener Safer Alternatives
As people are becoming more conscious about greener alternatives to many things, it’s important to know that there are safer alternatives for finishing wood. The application results may appear darker, but that’s not always the case. Here are some alternatives to research for your upcoming project:
- Teak Oil
- Shellac
- Candelilla Wax
- Linseed Oil
- Tung Oil
- Varnish
- Lacquer
Indoor Treehouse Assembly
After all pieces were cut, sanded, and polyurethaned, it was assembly time. We predrilled holes around the areas where we planned to secure the shelves to the tree trunk. This allowed for screwing into the wood without splitting it.
The oak base was curved on the underside, so I installed adjustable feet for stability and leveling. Here are a bunch of choices. https://amzn.to/3ZfJj5z I have found that feet not only provide stability, they protect the floor from scratching.
Decorative Touches & Details
Decorative touches really matter. It’s important that they all be functional and attractive. I wanted to make sure the final product of our indoor treehouse wasn’t a trunk with a bunch of shelves. It needed to look like exactly what it was…a treehouse!
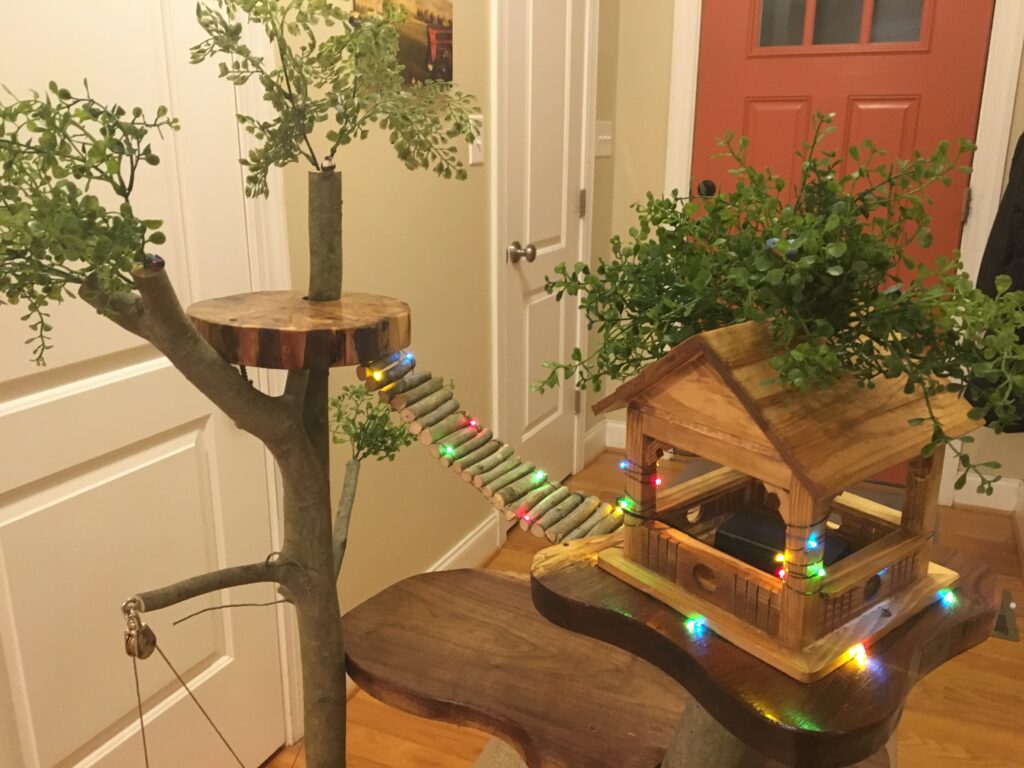
Bridge
Kids love bridges. To construct the bridge for this treehouse, a stick cut into pieces about 3 inches long was ideal. I then drilled a hole through each end with a tiny drill bit. Next, I fed wire through each piece to connect them. They formed a nice sturdy bridge and this bridge nicely pulled the tree tops together. By the way, bridges are a great place to include lights.
Details
The beauty of this indoor treehouse was in the details and I knew those details were important to successfully pull the whole thing together. Furniture, lights, greenery, ladders, swings, and so much more were significant additions. For example, the top level was perfect for a small birdhouse that I picked up from Michaels. I think it was one of those $5 unfinished wood deals. It was an inexpensive, useful addition, and my daughter had such fun putting her little people and animals in there.
Indoor Treehouse Greenery
I chose artifical greenery for the appearance of tree leaves. There was a nice selection in the floral section of Hobby Lobby. Artificial greenery stems have wire in them, which is great for shaping stems and creating the look of a full tree. To secure the greenery, I used a drill bit to make holes in the wood the size of the stems. That ensured the greenery was snug and wouldn’t fall out.
Battery Powered Lights
When the project was nearly finished, it was time to light the place up. So, I wrapped the trunk and birdhouse with wire strands of battery powered LED lights. We tucked the battery boxes out of sight – under the base of the treehouse and in the birdhouse. Lights create an ambiance of “come and stay for awhile.” It seemed to work, but more on that with our happy ending.
Furniture & Accessories
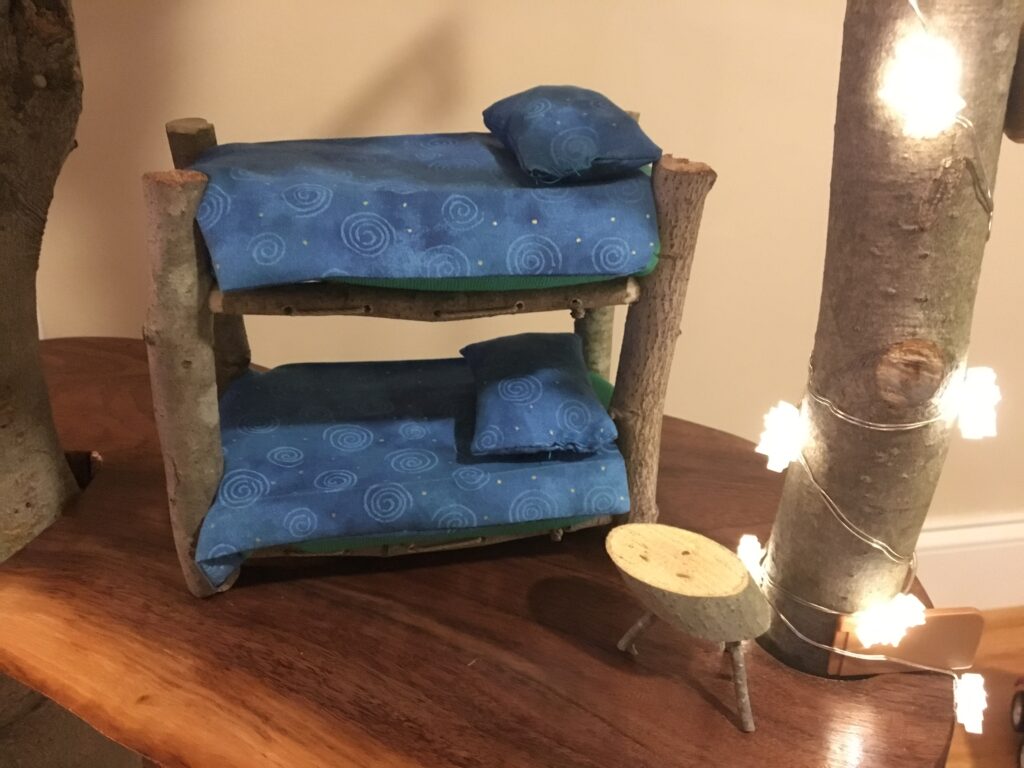
My husband made adorable pieces of furniture out of wood scraps and sticks.
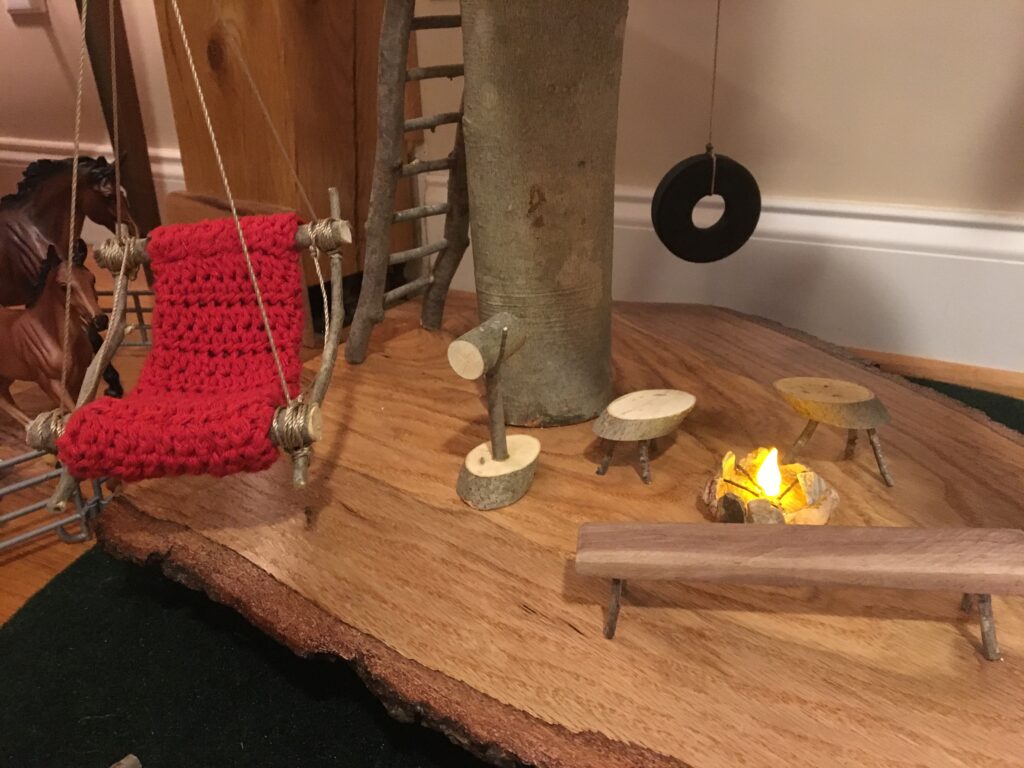
The campfire was just a tea light with rocks hot glued around it. I also bundled little sticks together and hot glued them for the campfire logs.
We created a rustic bunkbed out of sticks, too. For the mattresses, I used some foam that I had leftover from a project. I then hand sewed fabric to snuggly fit around them. Next, for the bedding, I dug through a bag of fabric scraps and found a cute pattern that looked like what my daughter would choose.
Finally, we needed a ladder, so we drilled small holes in sticks and connected them with smaller sticks for the “rungs”.
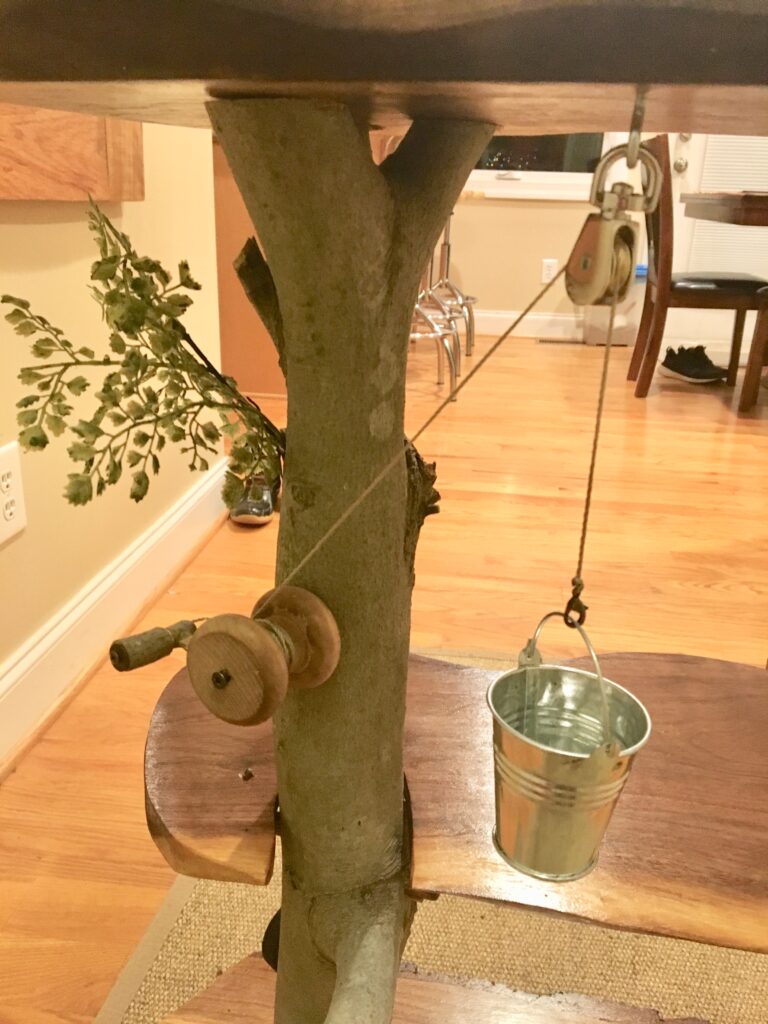
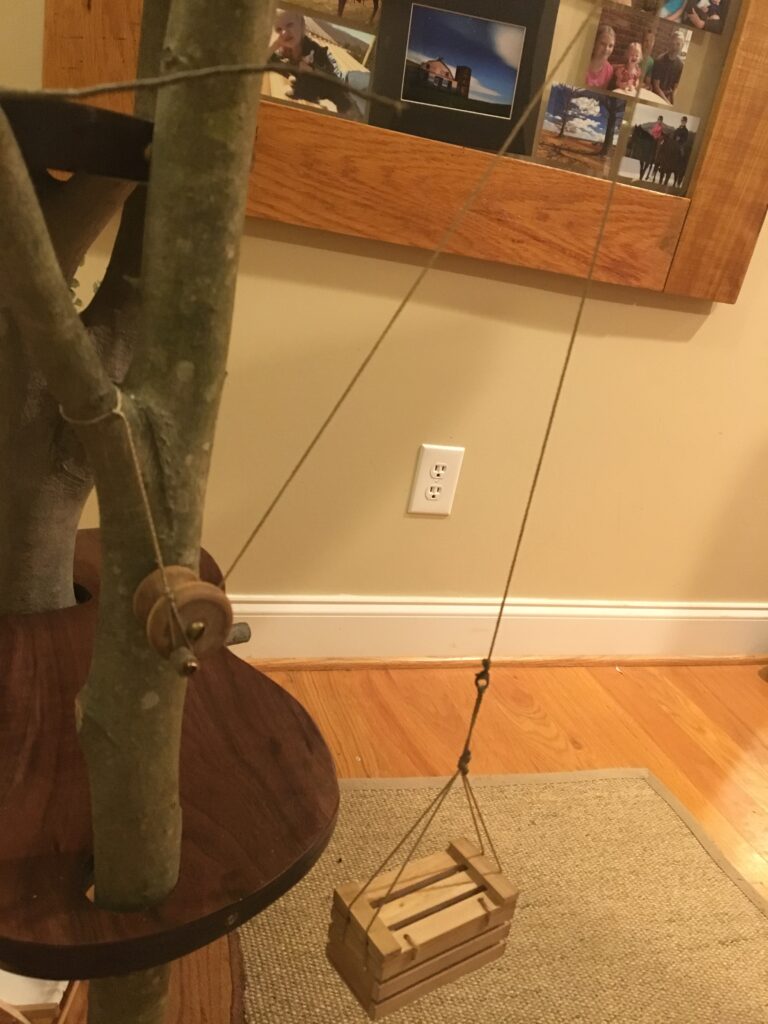
Indoor Treehouse Pulley
Kids love to make believe by lifting and moving things, and a pulley is irresistable. It’s endless entertainment, so we knew we had to include them in the design. We installed a couple, and my daughter has enjoyed transporting her animals up and down each level.
A Few More Details

I want to point out a few other details. I picked up the little lounge chairs above for less than $2 each at Michaels. Since many children’s books have stories with a letter, mail, or a mailbox in them, that mailbox served as an imaginary or storybook piece. The mailbox was an adorable little additon and my husband made it out of stick pieces.
Special Indoor Treehouse Gift
It was time to present the gift for a happy ending…
We gave this indoor treehouse to our daugther for Christmas. We couldn’t wait to see her reaction. She was ecstatic. This was going to be a toy that she could enjoy with her collection of animals. She has all kinds of animals. I particularly like the Schleich animals and their detailed features https://amzn.to/3KDWgSX She now had a perfect place to engage her imagination.
Heirloom Treehouse
One of the things she enjoyed the most was looking at her treehouse all lit up at night after the lights were turned out. I thought it was pretty cool, too.
I hope I’ll one day have it in my living room for when the grandkids come to visit and I may keep lights on it at night. It really is a piece of art to me. It’s one of those toys that I refer to as an “heirloom piece,” because my husband and I built it with love. We have fond memories of her seeing it for the first time and I really believe it will be passed down at least to the next generation.
A Child’s Metal Bed DIY
If you like this indoor treehouse DIY, check out my latest blog on how to transform a metal bed for a child’s bedroom https://lifeinthecountryusa.com/metal-bed-paint/.
One Reply to “Indoor Treehouse”
Comments are closed.